RAZORING YOUR MINIATURE HORSE’S FACE
Article by Laura Tennill – Ten-L Training Center
Laura was very generous to allow me to put this article on our site. Her tips are very helpful! Many pet owners do not like the look of a "razored face," but you will see it often in the show ring and in the AMHA World magazine.
First of all I would like to say that there are several ways to razor a horse’s face. This is the way I like to razor my show horse’s face and I have written this article to help those that want to learn how to do this.
Razoring your horse’s face can really enhance the overall finish on your show horse! It does take some practice and patience to do a really good job, so I would encourage you to practice razoring your horse a bit of time prior to your first show so that you will have one or two practice sessions in before the show.
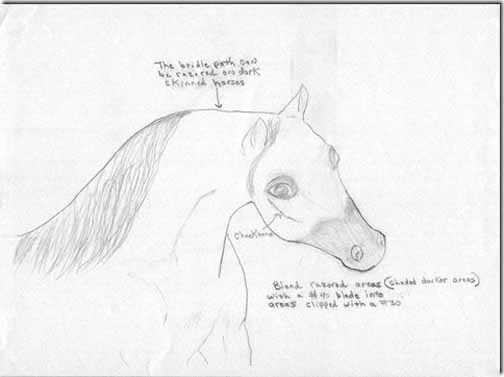
Prior to razoring, you will need to clip your horse’s head close to the day your horse will be showing. We normally clip the show horses’ heads one to three days prior to their class with a #30 blade. The day before the horse shows, I use a #50 blade on all areas that need to be razored. Check closely to be sure you have all the hair off in these areas so that the razor will do a smoother job that way and it will also take less time which benefits both you and your horse.
You can blend the areas done with a #50 up into the areas clipped with a #30 blade with a #40 blade, using very light upwards strokes and you can do this after razoring if you want to do that, to make a smoother appearance between the razored areas and the actual haircoat.
Your horse will look best razored the day before he shows if possible, or as close to that as you can do it. The hair will grow out quickly and then the light oil, baby oil gel or face glo gel will not shine as much nor look as smooth if those areas are razored too early.
One of the main reasons we use a #50 blade on the horse’s areas to be razored right before it is to avoid nicking them as much as possible. It also makes it much easier to razor a horse too with very little hair to take off.
Just before your razor each area of your horse, take a clean washcloth or small towel and dip it in very warm water, wringing the excess water out. Place the cloth over the top of the eyes or muzzle, whichever area you razor first and hold it there a minute. The warmth of the warm water really helps to prep the skin and hair for razoring and will help you do a neater job it it.
Then place a bit of shaving cream or shaving gel on one area at a time that you are razoring. Carefully move your razor over the top of the eye, using light but even pressure.
Be sure to take your razor and dip it in a bucket of water to rinse it often to clean out clogged hair in the blades. You will want to be slightly higher over the center of the eye and then come down nicely to the edges and corners of the eye as show in the diagram.
After razoring above each eye, take your wash cloth and rinse the saving cream or gel off. This will enable you to see how well you have done in getting the hair off or straightening your lines out a bit if needed. Razoring above the eyes really makes the eyes stand out in the show ring!
| Then proceed to the muzzle doing one side at a time, using the warm wash cloth first to prepare the skin and hair. Use your shaving cream or gel as much as you need to. Also you may need to use a few razors to get each horse done, so when they are not getting the hair off well, try using a fresh new one. Sometimes you will find creases that are harder to get to, especially around the nostril area. You may need to use your fingers to spread the skin out a bit there in those areas to razor them well. By having the horses closely shaved with the #50 blade in these areas, it will help greatly to razor these areas especially and help to avoid nicking your horse while razoring him. I normally like to razor upwards towards the area where your show halter will be, making a slightly rounded v in this area as shown on the diagram. Angle your razored areas back on the lower side of each jaw too so that there is not just a straight line going around the horse’s nose. You can blend upward using light strokes into the area where the hair meets the razored areas to make less lines there and a nice blended smooth look. You may need to remove your horse’s halter and put it around his neck while finishing the razoring on the face. |
 |
For a more dramatic look, you can razor in all areas where the #50 blade was used all the way up under the eyes. This takes some practice to do this well. This especially looks good on dark bays and black horses. If you are just learning, you might do better to just razor up to the noseband of the horse and back on the lower side of the jawline too angling back nicely for a clean look. Practice on your horse prior to prepping for the first show and see what you like on that particular horse. You can look at how he will appear razored that way. You can also practice on how high you want to razor his muzzle, some people like to razor a bit lower or higher too depending on their personal preference on this.
*****Please remember, a closely clipped or razored horse can really sunburn easily, especially where there is any white hair. Be careful to keep them out of the sunlight as much as possible or they will turn pink very quickly. If you wash them, get them in out of the sun quickly to dry inside, is possible. Their pink areas can really turn red, if not watched very closely. *****
*****Some horses with bald faces, cremellos and perlinos may look better lightly razored or just using a #40 or #50 blade on their muzzle and above the yes. You will just have to practice to see what looks best on your particular horse. If you are going to show them outdoors, they may need to have a bit of sun block on those areas prior to being out in the sunlight much.*****
*****The better quality razors do a much better job razoring, less nicking to the horse and a clear shave. So please take your horse’s welfare into consideration on this. There are several really good brands of razors, including the Gillette Twin Blade Plus, for example.*****
*****Be sure to rinse the areas razored very well after razoring to remove all shaving cream or gel.*****
*****In colder climates, the razored areas will grow back very quickly. Keep a few extra razors on hand at the show.*****
*****We often razor right after washing the horses, it seems to make it go much more quickly and they are clean and less nicking of the horse as well.*****
You can dramatically enhance your horse’s appearance in the show ring with a nice clean razoring job. You can just add a bit of highlighter clear gel, baby oil gel or light oil to your horse’s face where he has been razored for a beautiful shine that will help your horse to show off his best features. For the shiniest look use Baby Oil gel and put it on right before you enter the arena. If you want a softer look that is still a nice soft shine, use Siverado Gel clear. After showing your horse, be sure to wash off the oil or show enhancers as the oil or mineral oil can retard a horse’s hair growth in these areas.
Laura Tennill
Ten-L Training Center
406 Dale Road E.
Taylorsville, KY 40071
502-231-0376
tenl16@aol.com
www.tenltraining.com
Entry page About us Articles Contact us For Sale Mares Stallions Our Dogs